
Tasco Game Camera Instructions: A Comprehensive Guide

Navigating ESET login issues and service disruptions, alongside potential server restarts, highlights the need for reliable camera setup guidance.
This comprehensive guide ensures optimal performance and troubleshooting for your Tasco game camera, offering clear instructions for seamless operation.
Understanding Your Tasco Game Camera
Your Tasco game camera is a sophisticated device designed for remote wildlife monitoring and security purposes. It utilizes a passive infrared (PIR) sensor to detect motion, triggering either a photograph or video recording. Understanding its core functionalities is crucial for maximizing its potential. Like accessing essential services – such as the ESET HOME portal – requires a stable connection, your camera needs proper setup.

The camera’s capabilities extend beyond simple image capture; it can operate in various modes, including photo, video, and hybrid, allowing for customized surveillance. Similar to troubleshooting login failures with ESET, understanding the camera’s menu system and button functions is key to resolving operational issues. Regular maintenance, akin to firmware updates, ensures optimal performance. Be aware of potential service disruptions, mirroring issues with accessing ESET’s website, and plan accordingly for data retrieval and camera checks.
Unboxing and Initial Setup
Carefully unpack your Tasco game camera and verify all components are present: the camera unit, mounting strap, and potentially a user manual. Initial setup mirrors troubleshooting connection issues – a methodical approach is vital. Before proceeding, inspect the camera for any physical damage sustained during shipping. Just as persistent login prompts from ESET can be frustrating, a damaged camera hinders functionality.
Familiarize yourself with the camera’s exterior, identifying the lens, PIR sensor, control panel, and battery compartment. Avoid immediate power-on; focus first on understanding the physical layout. Like ensuring ESET services are running, proper preparation prevents later complications. The initial setup also involves selecting a suitable SD card (sold separately) and ensuring it’s compatible with the camera’s specifications. This foundational step, like a stable server connection, is critical for successful operation.
Installing Batteries and SD Card
Begin by locating the battery compartment, typically secured with a latch. Insert the recommended number of batteries (usually AA or AAA), observing the correct polarity as indicated inside the compartment – mirroring the precision needed for ESET login credentials. Ensure batteries are fresh for optimal performance; low battery power can cause erratic behavior, similar to connection failures.

Next, locate the SD card slot. Gently insert a compatible SD card until it clicks into place. Avoid forcing it, as this could damage the card or the camera. Just as restarting ESET services can resolve issues, a properly seated SD card is essential for image and video storage. Power on the camera to confirm the SD card is recognized. If not, try re-seating the card or using a different one. A functioning SD card, like a stable server, is fundamental to the camera’s operation.
Camera Modes Explained: Photo, Video, and Hybrid
Tasco game cameras offer versatile modes to suit diverse monitoring needs. Photo mode captures still images, ideal for quick snapshots of wildlife activity – much like a quick system check for ESET connection status. Video mode records moving images, providing detailed observations of animal behavior. Consider the length of video clips when managing storage, akin to managing log files on a server.
Hybrid mode combines both photo and video capabilities, capturing a still image with each video recording. This offers a comprehensive record of events. Adjusting these modes requires navigating the camera’s menu, similar to accessing the ESET HOME portal. Experiment with each mode to determine which best suits your specific monitoring goals. Remember, consistent operation relies on proper settings, just as a stable connection is vital for ESET functionality.
Configuring Date, Time, and Location
Accurate date and time stamping are crucial for organizing and analyzing your game camera footage. Access the camera’s menu system to locate the date/time settings. Ensure the time zone is correctly configured to match your location, preventing discrepancies in event logging – similar to ensuring correct server time for ESET services. Incorrect settings can render data useless, much like failed login attempts due to time synchronization issues.
Some Tasco models offer GPS functionality to embed location data into each image or video. If available, enable this feature for precise tracking of animal movements. Regularly verify the date and time settings, especially after changing batteries. Proper configuration ensures reliable data, mirroring the importance of a stable connection for accessing the ESET HOME portal.
Image and Video Settings
Optimizing image and video settings is key to capturing clear, usable footage. Within the camera’s menu, you’ll find options to adjust these parameters. Consider the environment; low-light conditions necessitate higher ISO settings, but this can introduce noise. Experiment with different settings to find the best balance for your specific location, much like troubleshooting connection issues with ESET requires varied approaches.
For video, choose a suitable frame rate – higher frame rates (e.g., 30fps) provide smoother motion, while lower rates (e.g., 15fps) conserve storage space. Adjust video length based on anticipated activity. Remember, just as consistent service restarts can resolve ESET issues, careful setting adjustments yield optimal results. Prioritize clarity and efficient storage utilization.
Resolution and Quality Options
Tasco game cameras offer a range of resolution and quality settings impacting image detail and file size. Lower resolutions (e.g., 640×480) conserve storage but sacrifice clarity, while higher resolutions (e.g., 12MP, 16MP) capture more detail, demanding more SD card space. Quality settings typically range from low to high, influencing compression levels – higher quality means less compression and larger files.
Consider your needs: for general surveillance, medium resolution and quality may suffice. For identifying specific details, prioritize higher settings. Much like addressing ESET login failures requires persistent effort, finding the optimal balance between resolution, quality, and storage is crucial. Regularly review footage to assess if current settings meet your requirements, adjusting as needed for best results.

Adjusting Sensitivity and Recovery Time
Sensitivity controls how easily the camera triggers, while recovery time dictates how long it waits before recording again. Higher sensitivity detects even slight movement, potentially leading to more false triggers (e.g., from wind or small animals). Lower sensitivity reduces false triggers but might miss quicker movements. Like troubleshooting persistent ESET login prompts, finding the sweet spot requires experimentation.
Recovery time prevents the camera from being overwhelmed. Short recovery times capture every movement but consume battery and storage rapidly. Longer times conserve resources but risk missing action. Start with medium settings and adjust based on observed results. If you’re getting too many blank images, lower sensitivity or increase recovery time. Consistent monitoring, similar to checking service status, is key.
Setting Trigger Speed and Interval
Trigger speed determines how quickly the camera captures an image or video after detecting motion, crucial for capturing fast-moving wildlife. Faster speeds are ideal for animals like deer or birds, but demand more processing power and battery life. Interval settings control the time between multiple captures when continuous motion is detected – akin to resolving repeated ESET login requests.
A short interval ensures you don’t miss any action during prolonged activity, but fills up storage quickly. Longer intervals conserve space but might miss details. Consider the typical behavior of your target animals. For example, if monitoring a feeding area, a shorter interval is beneficial. Experiment to balance capture rate with storage capacity. Regularly review footage, much like monitoring service connections, to optimize these settings.

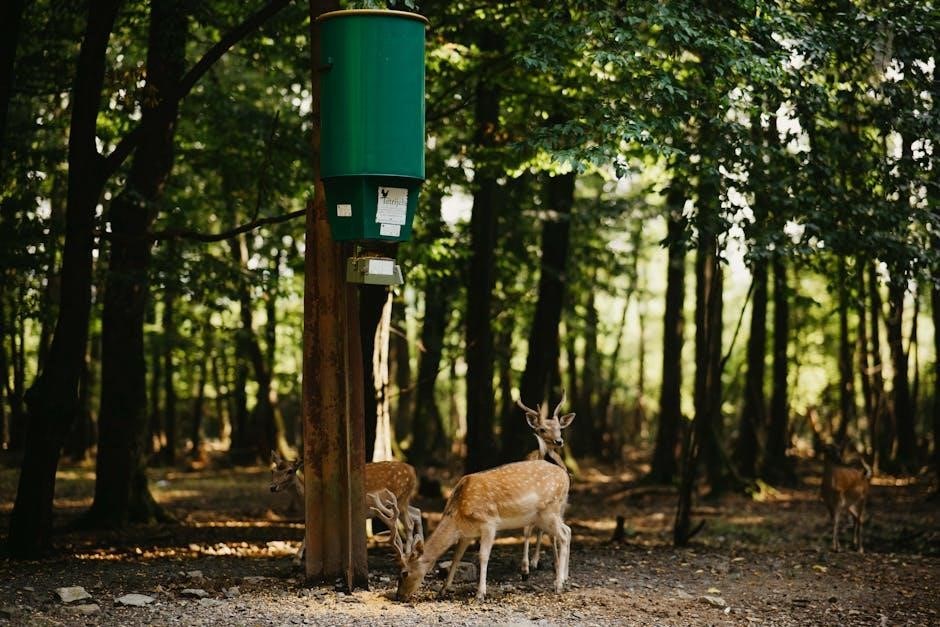
Mounting and Placement Strategies
Secure mounting is paramount for stability and preventing theft, mirroring the importance of secure network connections like those experienced with ESET. Choose a sturdy tree or post, ensuring minimal sway. Utilize the provided mounting strap or purchase a more robust bracket for added security. Consider the camera’s field of view – aim for areas with high animal traffic, such as trails, feeding grounds, or water sources.
Avoid direct sunlight, which can cause glare and wash out images. Position the camera slightly angled downwards to capture more detail and reduce the chance of capturing only sky. Camouflage the camera with natural materials to blend it into the environment. Regularly check the mounting to ensure it remains secure, similar to monitoring service status. Proper placement maximizes capture opportunities and minimizes unwanted triggers.
Optimal Camera Height and Angle
Achieving the ideal height and angle is crucial for capturing clear, useful images, much like maintaining a stable connection for ESET services is vital. A height of 3-5 feet generally provides a good balance, capturing animals at their natural size without excessive sky or ground. However, adjust based on the target species; lower for smaller animals, higher for larger ones.
A slight downward angle (around 10-15 degrees) maximizes detail and minimizes glare. Avoid pointing directly at the sun. Experiment with different angles to find what works best for your specific location and desired results. Consider the terrain; adjust the angle to compensate for slopes. Regularly review captured images to fine-tune the camera’s positioning, ensuring optimal performance and valuable data, similar to troubleshooting login failures.
Camouflage and Security Considerations
Protecting your investment, like securing your ESET account, requires proactive measures. Camouflage is paramount; use natural materials to blend the camera with its surroundings. Consider foliage, branches, or commercially available camouflage netting. Avoid bright colors or reflective surfaces. Regularly check the camouflage to ensure it remains effective, especially after weather changes.

Security is equally important. Utilize a security cable and lock to deter theft, particularly in accessible areas. Choose a discreet mounting location, away from frequently traveled paths. Be mindful of local regulations regarding trail camera use. Periodically inspect the mounting hardware for damage or tampering. Just as consistent monitoring is needed for ESET alerts, regular checks safeguard your camera and valuable footage.
Navigating the Camera Interface
Similar to troubleshooting ESET login failures, understanding your camera’s interface is crucial for effective operation. The Tasco game camera typically features a small LCD screen and several buttons for menu navigation. The ‘Menu’ button accesses the primary settings, while directional buttons allow scrolling through options. ‘OK’ or ‘Enter’ confirms selections, and ‘Back’ or ‘Cancel’ returns to the previous screen.
Familiarize yourself with the icon-based menu system. Icons represent settings like date/time, image resolution, and trigger speed. A clear understanding of these icons streamlines configuration. Refer to the user manual for detailed explanations of each function. Just as persistent ESET prompts require attention, exploring the interface ensures you unlock the camera’s full potential and customize it to your specific needs.
Menu System Overview
Echoing the layered structure of navigating ESET’s security settings, the Tasco camera’s menu system is organized into logical sections. The main menu typically presents options for ‘Setup,’ ‘Record Mode,’ ‘Playback,’ and ‘System.’ ‘Setup’ handles fundamental configurations like date, time, and location. ‘Record Mode’ allows selection between photo, video, or hybrid modes, mirroring choices in security software.
‘Playback’ enables reviewing captured images and videos directly on the camera’s LCD screen. ‘System’ contains advanced settings such as language, sound volume, and firmware updates – akin to maintaining software integrity. Each submenu offers further nested options. Just as resolving ESET connection issues requires methodical steps, systematically exploring each menu level unlocks the camera’s full functionality and ensures optimal performance.
Button Functions and Controls

Similar to troubleshooting ESET login failures requiring precise actions, mastering the Tasco camera’s controls is crucial for effective operation. The ‘Power’ button initiates and terminates camera operation. ‘Menu’ accesses the primary settings interface, allowing navigation through various options. ‘Up/Down’ arrow buttons facilitate scrolling through menu items and adjusting settings values, mirroring the selection process within software interfaces.
The ‘OK/Select’ button confirms selections and enters submenus. A dedicated ‘Play’ button enables reviewing captured media. Some models feature a ‘Test’ button to verify sensor triggering. Understanding these functions, much like resolving service connectivity issues, prevents frustration and ensures efficient camera management. Refer to your specific model’s diagram for precise button locations and functionalities.
Troubleshooting Common Issues
Echoing the challenges faced with ESET login failures and service disruptions, Tasco game cameras can encounter operational hiccups. If the camera fails to power on, verify battery polarity and charge levels. SD card errors, akin to connectivity problems, often stem from card incompatibility or corruption; try a different, formatted card. Blurred images suggest focusing issues or obstructions.
Insufficient trigger range indicates incorrect sensitivity settings or obstructions blocking the sensor. If the camera isn’t recording, double-check the recording mode and SD card space. Like restarting ESET services, a simple camera reset can resolve minor glitches. Regularly check for firmware updates, mirroring software maintenance, to ensure optimal performance and compatibility. Consult the manual for model-specific troubleshooting steps.
Camera Not Powering On
Similar to encountering login failures with ESET, a camera refusing to power on is a common frustration. First, meticulously verify battery polarity – incorrect insertion is a frequent cause. Ensure you’re using fresh batteries with sufficient charge; even “new” batteries can be weak. Inspect the battery compartment for corrosion or debris that might impede contact.
If using an external power source, confirm the adapter is functioning correctly and securely connected. A faulty power adapter can mimic a dead battery. Try a different set of batteries to rule out a batch issue. If the problem persists, examine the power switch for damage. Resetting the camera (if possible without power) might resolve internal glitches, much like restarting a service. Consult the manual for specific troubleshooting steps related to your Tasco model.
SD Card Errors and Solutions
Echoing the connectivity issues seen with ESET, SD card problems are frequent with game cameras. If the camera displays an “SD Card Error,” first ensure the card is properly inserted and not damaged. Try a different, known-working SD card to isolate the issue. Formatting the SD card within the camera (if the camera recognizes it enough to allow this) is often the solution, but back up any existing data first!
Verify the SD card’s compatibility – Tasco cameras have maximum supported capacities. A card exceeding this limit won’t function. Check for physical damage to the card itself, like cracks or bent pins. If formatting fails, use a computer to format the card as FAT32. Avoid high-capacity or ultra-fast cards unless specifically supported by your camera model. Consider a different brand of SD card, as compatibility can vary.

Connectivity Problems (if applicable)
Mirroring the ESET login failures and server connection issues, some Tasco cameras offer wireless connectivity (Wi-Fi or cellular). If your camera has these features, connectivity problems can arise. First, confirm the camera is within range of your Wi-Fi network or has adequate cellular signal. Double-check the entered Wi-Fi password within the camera’s settings – even a single incorrect character prevents connection.
For cellular models, ensure the SIM card is active and has sufficient data allowance. Restarting the camera and your home router can often resolve temporary glitches. If problems persist, consult the Tasco support website for firmware updates, as these frequently address connectivity bugs. Verify the camera’s APN settings (Access Point Name) are correctly configured for your cellular provider. Finally, consider interference from other wireless devices.
Firmware Updates and Maintenance
Similar to resolving ESET service issues through updates and restarts, maintaining your Tasco camera’s firmware is crucial for optimal performance. Regularly check the official Tasco website for available firmware updates. These updates often include bug fixes, improved functionality, and enhanced security features, mirroring the fixes provided by ESET for their software.
Download the update file to your SD card and follow the camera’s on-screen instructions to install it. Always ensure the camera has sufficient battery power during the update process to prevent interruption. Periodically clean the camera lens with a soft, dry cloth to maintain image clarity. Inspect the camera housing for any damage and ensure the battery compartment is free of corrosion. Proper storage during off-season is also vital – remove batteries and store in a cool, dry place.